NotionPublisherPlugin - Notion 发布插件
NotionPublisherPlugin 能够将文章直接发布到 Notion 页面,自动将 Markdown 内容转换为 Notion 的块格式。
安装
该插件包含在 @artipub/core 包中:
bash
npm install @artipub/core配置
ts
interface NotionPublisherPluginOption {
  /**
   * 来自您的集成的 Notion API 密钥
   * 必需:是
   */
  api_key: string;

  /**
   * 文章将作为子页面发布到的父页面 ID
   * 必需:是
   */
  page_id: string;

  /**
   * 指定要更新的页面 ID(覆盖自动追踪)
   * 必需:否
   */
  update_page_id?: string;
}
设置指南
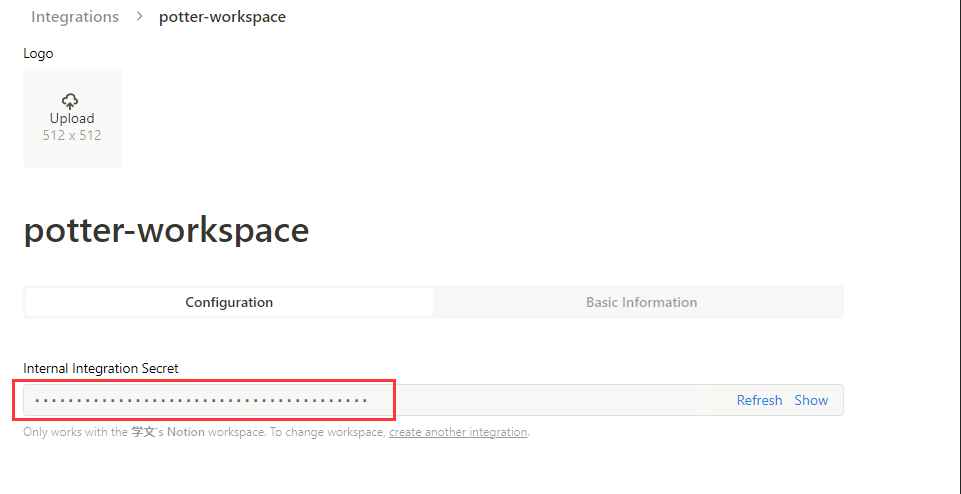
步骤 1:创建 Notion 集成
- 导航到 Notion 集成页面
- 点击"新建集成"
- 配置您的集成:
- 名称:给它一个描述性名称(如"ArtiPub 发布器")
- 关联的工作区:选择您的工作区
- 功能:确保启用"读取内容"、"更新内容"和"插入内容"
- 点击"提交"创建集成
- 复制"内部集成令牌" - 这就是您的
api_key

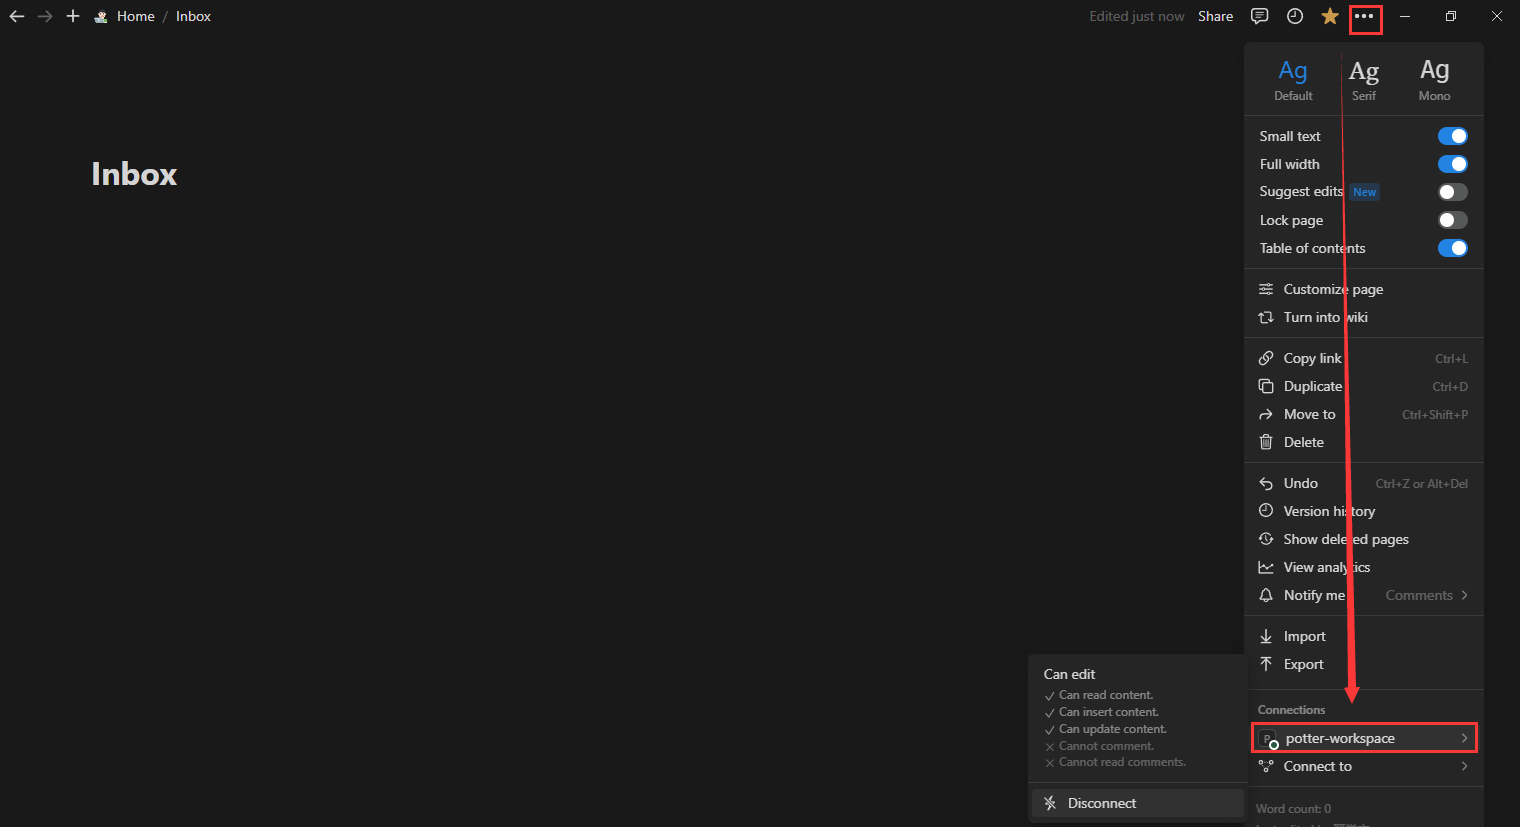
步骤 2:将集成连接到页面
- 在 Notion 中创建或选择一个页面,文章将发布到这里(如"文章收件箱")
- 将集成连接到页面:
- 在 Notion 中打开页面
- 点击右上角的"..."菜单
- 选择"添加连接"
- 搜索并选择您的集成

步骤 3:获取页面 ID
有两种方法获取页面 ID:
方法 1:从 URL 获取
- 在 Notion 中打开页面
- 从页面菜单中点击"复制链接"
- URL 格式:
https://www.notion.so/页面名称-{page_id} - 提取最后一个连字符后的 ID
示例:
URL: https://www.notion.so/我的文章-abc123def456
页面 ID: abc123def456
方法 2:从开发者工具获取
- 在浏览器中打开 Notion
- 打开开发者工具 (F12)
- 导航到网络选项卡
- 重新加载页面
- 查找包含页面 ID 的请求

使用方法
基础示例
ts
import { ArticleProcessor, PublisherManager, NotionPublisherPlugin } from "@artipub/core";

// 首先处理您的文章
const processor = new ArticleProcessor({
  uploadImgOption: {
    // 您的图片上传配置
  },
});

const { content } = await processor.processMarkdown("./article.md");

// 创建发布器并添加 Notion 插件
const publisher = new PublisherManager(content);

publisher.addPlugin(
  NotionPublisherPlugin({
    api_key: process.env.NOTION_API_KEY!,
    page_id: process.env.NOTION_PAGE_ID!,
  })
);

// 发布到 Notion
const results = await publisher.publish();
console.log(results);
// 输出: [{ name: 'NotionPublisher', success: true, info: '...', pid: '...' }]
使用环境变量
创建 .env 文件:
env
NOTION_API_KEY=secret_xxxxxxxxxxxxxxxxxxxxxxxxxxxxxxxxxxxxxxxxxxx
NOTION_PAGE_ID=abc123def456789
在代码中使用:
ts
import dotenv from "dotenv";
dotenv.config();

publisher.addPlugin(
  NotionPublisherPlugin({
    api_key: process.env.NOTION_API_KEY!,
    page_id: process.env.NOTION_PAGE_ID!,
  })
);
高级:发布到数据库
如果您的 page_id 指向 Notion 数据库,文章将作为数据库条目创建:
ts
// 数据库特定配置
const notionPlugin = NotionPublisherPlugin({
  api_key: process.env.NOTION_API_KEY!,
  page_id: process.env.NOTION_DATABASE_ID!, // 数据库 ID 而不是页面 ID
});

// 插件将自动检测这是一个数据库并创建条目
publisher.addPlugin(notionPlugin);
功能特性
支持的 Markdown 元素
插件自动将这些 Markdown 元素转换为 Notion 块:
| Markdown 元素 | Notion 块类型 |
|---|---|
| 标题 (h1-h3) | 标题块 |
| 段落 | 段落块 |
| 粗体/斜体 | 富文本格式 |
| 链接 | 链接注释 |
| 图片 | 图片块 |
| 代码块 | 带语言的代码块 |
| 内联代码 | 代码注释 |
| 引用块 | 引用块 |
| 列表(有序/无序) | 编号/项目符号列表块 |
| 表格 | 表格块 |
| 水平线 | 分隔线块 |
图片处理
- 本地图片自动上传到 Notion
- 外部图片 URL 保持不变
- 图片的 alt 文本作为标题保留
代码块支持
代码块保留语法高亮:
ts
// 这段 TypeScript 代码在 Notion 中将有正确的语法高亮
const example = "语法高亮有效!";
文章更新
当 isTraceUpdate 启用(默认)时,插件会跟踪已发布的文章:
- 首次发布:创建新的 Notion 页面并保存页面 ID
- 后续发布:更新现有页面而不是创建重复项
ts
// 带有唯一 ID 的文章将被跟踪
const content = `# 我的文章
id: unique_article_123

文章内容...`;

// 首次发布 - 创建新页面
await publisher.publish();

// 稍后更新 - 更新同一页面
await publisher.publish();
故障排除
常见问题
1. "未授权"错误
原因:无效的 API 密钥或集成未连接到页面
解决方案:
- 验证您的 API 密钥是否正确
- 确保集成已连接到目标页面
- 检查集成权限
2. "对象未找到"错误
原因:无效的页面 ID 或页面不存在
解决方案:
- 仔细检查页面 ID 提取
- 确保页面存在且未被删除
- 验证您使用的是正确的工作区
3. "权限不足"错误
原因:集成缺少必要的权限
解决方案:
- 检查 Notion 设置中的集成功能
- 确保启用"插入内容"和"更新内容"
- 重新连接集成到页面
4. 图片未显示
原因:图片上传失败或无效的 URL
解决方案:
- 确保图片已由 ArticleProcessor 正确处理
- 检查图片 URL 是否可访问
- 验证 Notion 是否有权访问外部图片
调试模式
启用调试日志以排查问题:
ts
const plugin = NotionPublisherPlugin({
  api_key: process.env.NOTION_API_KEY!,
  page_id: process.env.NOTION_PAGE_ID!,
});

// 添加自定义日志
const originalProcess = plugin.process;
plugin.process = async (...args) => {
  console.log("发布到 Notion...");
  try {
    const result = await originalProcess.apply(plugin, args);
    console.log("Notion 发布结果:", result);
    return result;
  } catch (error) {
    console.error("Notion 发布错误:", error);
    throw error;
  }
};
最佳实践
1. 使用数据库进行组织
使用 Notion 数据库以获得更好的组织:
ts
// 发布到带有属性的数据库
const dbPlugin = NotionPublisherPlugin({
  api_key: process.env.NOTION_API_KEY!,
  page_id: process.env.NOTION_DATABASE_ID!,
});

// 文章成为带有元数据的数据库条目
2. 错误处理
始终处理潜在的失败:
ts
try {
  const results = await publisher.publish();
  const notionResult = results.find((r) => r.name === "NotionPublisher");

  if (!notionResult?.success) {
    console.error("Notion 发布失败:", notionResult?.info);
    // 实现回退逻辑
  }
} catch (error) {
  console.error("发布错误:", error);
  // 处理关键错误
}
3. 速率限制
Notion API 有速率限制。为批量发布实现延迟:
ts
async function publishMultipleArticles(articles: string[]) {
  for (const article of articles) {
    const publisher = new PublisherManager(article);
    publisher.addPlugin(notionPlugin);

    await publisher.publish();

    // 添加延迟以遵守速率限制
    await new Promise((resolve) => setTimeout(resolve, 1000));
  }
}
4. 特定环境配置
为不同环境使用不同的 Notion 页面:
ts
const notionConfig = {
  api_key: process.env.NOTION_API_KEY!,
  page_id: process.env.NODE_ENV === "production" ? process.env.NOTION_PROD_PAGE_ID! : process.env.NOTION_DEV_PAGE_ID!,
};

publisher.addPlugin(NotionPublisherPlugin(notionConfig));